本文作者blast。
首发于nul.pw,转载请保留此行。
ChakraCore 是微软开源的 Microsoft Edge 浏览器 Chakra JavaScript 引擎的核心部分,主要用于
Microsoft Edge 和 Windows 中 HTML/CSS/JavaScript 编写的应用。
ChakraCore 支持 x86/x64/ARM 架构 JavaScript 的 Just-in-time (JIT)
编译,垃圾收集和大量的最新 JavaScript 特性。ChakraCore 还支持 JavaScript Runtime (JSRT)
APIs,允许用户简单嵌入 ChakraCore 到应用中。
ChakraCore 是一个功能完整的、独立的 JavaScript 虚拟机,可嵌入到衍生产品中,驱动需要脚本功能的产品如 NoSQL
数据库、生产力工具和游戏引擎。ChakraCore 现阶段只支持 Windows,但微软表示将类似 .NET 开源项目加入跨平台支持。
via http://www.oschina.net/p/chakracore
本文采用#2720的代码为例,使用的测试代码为:
var a;
const b = 4;

a = 3;

print(a+b);
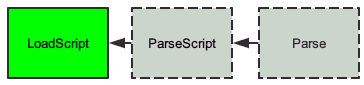
略过前方的栈,我们从编译的地方开始说起。ChakraCore在Js::ScriptContext::LoadScript开始“正式”加载脚本。
>   ChakraCore.dll!Js::ScriptContext::LoadScript(const unsigned char * script, unsigned int cb, const SRCINFO * pSrcInfo, CompileScriptException * pse, Js::Utf8SourceInfo * * ppSourceInfo, const wchar_t * rootDisplayName, LoadScriptFlag loadScriptFlag, void * scriptSource) 行 1948    C++     ChakraCore.dll!RunScriptCore::__l2::<lambda>(Js::ScriptContext * scriptContext, TTD::TTDJsRTActionResultAutoRecorder &
_actionEntryPopper) 行 2952  C++     ChakraCore.dll!ContextAPINoScriptWrapper::__l2::<lambda>(Js::ScriptContext
* scriptContext) 行 294  C++     ChakraCore.dll!ContextAPINoScriptWrapper_Core<_JsErrorCode <lambda>(Js::ScriptContext *)
>(ContextAPINoScriptWrapper::__l2::_JsErrorCode <lambda>(Js::ScriptContext *) fn, bool allowInObjectBeforeCollectCallback, bool scriptExceptionAllowed) 行 254   C++     ChakraCore.dll!ContextAPINoScriptWrapper<_JsErrorCode <lambda>(Js::ScriptContext *, TTD::TTDJsRTActionResultAutoRecorder &)
>(RunScriptCore::__l2::_JsErrorCode <lambda>(Js::ScriptContext *, TTD::TTDJsRTActionResultAutoRecorder &) fn, bool allowInObjectBeforeCollectCallback, bool scriptExceptionAllowed) 行 291   C++     ChakraCore.dll!RunScriptCore(void * scriptSource, const unsigned char * script, unsigned int cb, LoadScriptFlag loadScriptFlag, unsigned long sourceContext, const wchar_t * sourceUrl, bool parseOnly, _JsParseScriptAttributes parseAttributes, bool isSourceModule, void * * result) 行 2901  C++     ChakraCore.dll!CompileRun(void * scriptVal, unsigned long sourceContext, void * sourceUrl, _JsParseScriptAttributes parseAttributes, void * * result, bool parseOnly) 行 4304    C++     ChakraCore.dll!JsRun(void * scriptVal, unsigned long sourceContext, void * sourceUrl, _JsParseScriptAttributes parseAttributes, void * * result) 行 4326 C++     ch.exe!ChakraRTInterface::JsRun(void * script, unsigned long sourceContext, void * sourceUrl,
_JsParseScriptAttributes parseAttributes, void * * result) 行 378    C++     ch.exe!RunScript(const char * fileName, const char * fileContents, void(__stdcall*)(void *) fileContentsFinalizeCallback, void * bufferValue, char * fullPath) 行 450    C++     ch.exe!ExecuteTest(const char * fileName) 行 744 C++     ch.exe!ExecuteTestWithMemoryCheck(char * fileName) 行 786    C++     ch.exe!StaticThreadProc(void * lpParam) 行 887   C++     ch.exe!invoke_thread_procedure(unsigned int(__stdcall*)(void
*) procedure, void * const context) 行 92    C++     ch.exe!thread_start<unsigned int (__stdcall*)(void *)>(void * const parameter) 行 115    C++
函数定义及起始位置如下;
ChakraCore.dll!Js::ScriptContext::LoadScript(const unsigned char * script, unsigned int cb, const SRCINFO * pSrcInfo, CompileScriptException * pse, Js::Utf8SourceInfo * * ppSourceInfo, const wchar_t * rootDisplayName, LoadScriptFlag loadScriptFlag, void * scriptSource) 行 1948
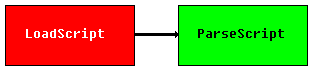
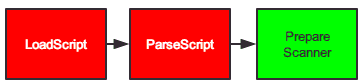
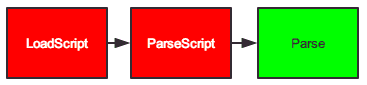
这个函数开始,就是正儿八经的解析脚本了。在LoadScript中,我们跟入调用《ParseScript》。
        ParseNodePtr parseTree = ParseScript(&parser, script, cb, pSrcInfo,
            pse, ppSourceInfo, rootDisplayName, loadScriptFlag,
            &sourceIndex, scriptSource);
看这个调用,这里许多参数是上层传递而来,所以在该函数中,ChakraCore会将传递来的信息保存到一块新申请的堆上内存中。
            if(*ppSourceInfo == nullptr)
            {
#ifndef NTBUILD
                if (loadScriptFlag & LoadScriptFlag_ExternalArrayBuffer)
                {
                    *ppSourceInfo = Utf8SourceInfo::NewWithNoCopy(this,
                        script, (int)length, cb, pSrcInfo, isLibraryCode,
                        scriptSource);
                }
Utf8SourceInfo::NewWithNoCopy中,ChakraCore创建内存,保存传入的这片源代码,然后返回这个新申请的内存。在检查了一些开关后,正常情况下在这里解析:
    ParseNodePtr parseTree;
    if((loadScriptFlag & LoadScriptFlag_Utf8Source) == LoadScriptFlag_Utf8Source)
    {
        hr = parser->ParseUtf8Source(&parseTree, script, cb, grfscr, pse,
            &sourceContextInfo->nextLocalFunctionId, sourceContextInfo);
    }
parser的定义是Parser*。ParseUtf8Source里,函数调用ParseSourceInternal:
HRESULT Parser::ParseUtf8Source(__out ParseNodePtr* parseTree, LPCUTF8 pSrc, size_t length, ULONG grfsrc, CompileScriptException *pse,
    Js::LocalFunctionId * nextFunctionId, SourceContextInfo * sourceContextInfo)
{
    m_functionBody = nullptr;
    m_parseType = ParseType_Upfront;
    return ParseSourceInternal( parseTree, pSrc, 0, length, 0, true, grfsrc, pse, nextFunctionId, 0, sourceContextInfo);
}
2 Parser::PrePareScanner -初始化HashTable、Scanner
void Parser::PrepareScanner(bool fromExternal)
{
    // NOTE: HashTbl and Scanner are currently allocated from the CRT heap. If we want to allocate them from the
    // parser arena, then we also need to change the way the HashTbl allocates PID's from its underlying
    // allocator (which also currently uses the CRT heap). This is not trivial, because we still need to support
    // heap allocation for the colorizer interface.

    // create the hash table and init PID members
    if (nullptr == (m_phtbl = HashTbl::Create(HASH_TABLE_SIZE)))
        Error(ERRnoMemory);
InitPids();
HASH_TABLE_SIZE是255。Create直接在CRT堆上分配了空间。HeapNewNoThrow这个wrapper最终实际就是调用了new。
HashTbl * HashTbl::Create(uint cidHash)
{
    HashTbl * phtbl;

    if (nullptr == (phtbl = HeapNewNoThrow(HashTbl)))
        return nullptr;
    if (!phtbl->Init(cidHash))
    {
        delete phtbl;  // invokes overrided operator delete
        return nullptr;
    }

    return phtbl;
}
再看看Init。
BOOL HashTbl::Init(uint cidHash)
{
    // cidHash must be a power of two
Assert(cidHash > 0 && 0 == (cidHash & (cidHash - 1)));

……
检查传入的值是否大于0且是2的倍数。
计算实际需要分配的大小,大小为cidHash * sizeof (Ident *), 32位上基本就是cidHash * 4了。输出到cbTemp。并检查是否出现整数溢出的情况。这个大小就是待会儿HashTable的空间。
uint cbTemp;
if (FAILED(UIntMult(cidHash, sizeof(Ident *), &cbTemp)) || cbTemp > LONG_MAX)
    return FALSE;
然后成员变量m_noReleaseAllocator所代表的,在不可释放的内存区域申请内存,大小为刚刚计算出来的值。然后清零内存。
    cb = cbTemp;
    if (nullptr == (m_prgpidName = (Ident **)m_noReleaseAllocator.Alloc(cb)))
        return FALSE;
    memset(m_prgpidName, 0, cb);
返回PrepareScanner后,调用InitPids。
图:m_rpid
InitPids中,调用CaseSensitiveComputeHash为各个常用的值做Hash并保存起来。算法如下:
ULONG CaseSensitiveComputeHash(LPCOLESTR prgch, LPCOLESTR end)
{
    ULONG luHash = 0;

    while (prgch < end)
    {
        luHash = 17 * luHash + *(char16 *)prgch++;
    }
    return luHash;
}
调用PidHashNameLenWithHash,如果已经添加进HashTable了,返回pid(Pointer to Identifier)。并根据条数决定是否需要调整bucket的大小。
然后,为当前Identifier分配大小,大小为字节长度len
(long)((Len + 1) * sizeof(OLECHAR) + sizeof(*pid))
以Len==9为例,32位下为:10*4+8 = 48。
再次分配(IdentPtr)m_noReleaseAllocator.Alloc(cb),生成一个Identifier的指针。并将指针插入hash list。IdentPtr是一个链表节点。然后,增加计数并填充刚刚插入的pid。
    /* Insert the identifier into the hash list */
    *ppid = pid;

    // Increment the number of entries in the table.
    m_luCount++;

    /* Fill in the identifier record */
    pid->m_pidNext = nullptr; //下一个节点
    pid->m_tk = tkLim;     //token类型
    pid->m_grfid = fidNil;    //flag
    pid->m_luHash = luHash;  //hash值
    pid->m_cch = cch;  //hash前字节长度
    pid->m_pidRefStack = nullptr;  //refStack
    pid->m_propertyId = Js::Constants::NoProperty;   //
    pid->assignmentState = NotAssigned;  //
    pid->isUsedInLdElem = false;     //

    HashTbl::CopyString(pid->m_sz, prgch, end); //将原始字符拷进去
就这样重复填充完wellKnownPropertyPids。
回到void Parser::PrepareScanner(bool fromExternal)。
现在,程序开始创建scanner。
// create the scanner
    if (nullptr == (m_pscan = Scanner_t::Create(this, m_phtbl, &m_token, m_scriptContext)))
    Error(ERRnoMemory);
scanner的创建一样也是在CRT堆上的,实际上调用了:
    static Scanner * Create(Parser* parser, HashTbl *phtbl, Token *ptoken, Js::ScriptContext *scriptContext)
    {
        return HeapNewNoThrow(Scanner, parser, phtbl, ptoken, scriptContext);
}
这也是个new的wrap。
回到上层函数,因为我们是从外部加载的,所以触发了这个分支。
if (fromExternal)
    m_pscan->FromExternalSource();
分支设置从外部扫描代码所需的开关。
    // If we get UTF8 source buffer, turn off doAllowThreeByteSurrogates but allow invalid WCHARs without replacing them with replacement 'g_chUnknown'.
void FromExternalSource() { m_decodeOptions = (utf8::DecodeOptions)(m_decodeOptions & ~utf8::doAllowThreeByteSurrogates | utf8::doAllowInvalidWCHARs); }
到此,PrepareScanner完成。
3 Parser::Parse - 创建AST
Parser::Parse的定义如下:
ParseNodePtr Parser::Parse(LPCUTF8 pszSrc, size_t offset, size_t length, charcount_t charOffset, ULONG grfscr, ULONG lineNumber, Js::LocalFunctionId * nextFunctionId, CompileScriptException *pse)
这个函数就是开始将文本处理成抽象语法树的入口函数了。
bool isDeferred = (grfscr & fscrDeferredFnc) != 0;
bool isModuleSource = (grfscr & fscrIsModuleCode) != 0;

m_grfscr = grfscr; //FLAG
m_length = length;  //长度
m_originalLength = length; //初始长度。现在为止,长度和初始长度是一样的。
m_nextFunctionId = nextFunctionId; //目前指向0。
PhaseDeferred_Upfront
我提供的例子没有任何函数,解析器从global(glo)开始解析。
首先,调用setText初始化scanner,把代码放入scanner并开始处理。
template<typename EncodingPolicy>
tokens Scanner<EncodingPolicy>::ScanCore(bool identifyKwds)
在ScanCore中,ChakraCore开始真正“分析”。程序逐字读入输入的脚本。在我的例子中
var a;
const b = 4;

a = 3;

print(a+b);
扫描到第一个字v之后,它会继续往后扫,直到扫出完整的var之后,记为一个token。(tkVAR == 57)然后,指针移动到var a的a处。
case 'v':
    if (identifyKwds)
    {
        switch (p[0]) {
        case 'a':
            if (p[1] == 'r' && !IsIdContinueNext(p+2, last)) {
                p += 2;
                token = tkVAR;
                goto LReserved;
            }
获取完这第一个token后,稍微停一下,程序需要返回外层,创建主knopProg节点并初始化。
然后,程序开始为const和let创建区域。在ES6中,const和let在范围上是等价的。
template<bool buildAST>
ParseNodePtr Parser::StartParseBlock(PnodeBlockType blockType, ScopeType scopeType, ParseNodePtr pnodeLabel, LabelId* pLabelId)
StartParseBlock为Global创建一个Scope。调用PushStmt,初始化AST。
回到Parser::Parse。程序开始对Statement List进行处理,statement就是各种变量定义:
    // Process a sequence of statements/declarations
    ParseStmtList<true>(
        &pnodeProg->sxFnc.pnodeBody,
        &lastNodeRef,
        SM_OnGlobalCode,
        !(m_grfscr & fscrDeferredFncExpression) /* isSourceElementList */);
这个函数中,有一个循环,会调用
template<bool buildAST>
ParseNodePtr Parser::ParseStatement()
来处理各种声明。并加入AST。
ParseStatement会调用ScanCore来找到各种token。就是我们上面说的那个ScanCore,每次ParseStatement处理完一个token,再次调用ScanCore的时候,就会从上次的token之后恢复,所以这也是为什么之前需要扫出第一个token的原因。
同时,在ParseStatement中我们也可以看到,chakra在处理const和let时是同一个分支去做的:
case tkCONST:
case tkLET:
    ichMin = m_pscan->IchMinTok();

    m_pscan->Scan();
    pnode = ParseVariableDeclaration<buildAST>(tok, ichMin);
    goto LNeedTerminator;
扫描到一个token后,他就会立刻再扫出后一个有效的语义。例如let后面会跟一个VariableId。扫出这个Id。
ParseVariableDeclaration中,函数为刚刚扫出的token建立一个node(CreateBlockScopedDeclNode),因为我们给出的类型是const的,所以这里是:
        else if (declarationType == tkCONST)
        {
            pnodeThis = CreateBlockScopedDeclNode(pid, knopConstDecl);
            CHAKRATEL_LANGSTATS_INC_LANGFEATURECOUNT(Const, m_scriptContext);
        }
然后,扫描到是在初始化,如果token允许初始化,程序调用ScanCore扫描值,并调用ParseExpr来解析值。
pnodeInit = ParseExpr<buildAST>(koplCma, nullptr, fAllowIn, FALSE, pNameHint, &nameHintLength, &nameHintOffset);
ParseExpr会实际调用ParseTerm处理。ParseTerm根据后面token的类型(这里是tkIntCon,即整数常量),来解析值。
 case tkIntCon:
        if (IsStrictMode() && m_pscan->IsOctOrLeadingZeroOnLastTKNumber())
        {
            Error(ERRES5NoOctal);
        }

        if (buildAST)
        {
            pnode = CreateIntNodeWithScanner(m_token.GetLong());
        }
        fCanAssign = FALSE;
        m_pscan->Scan();
        break;
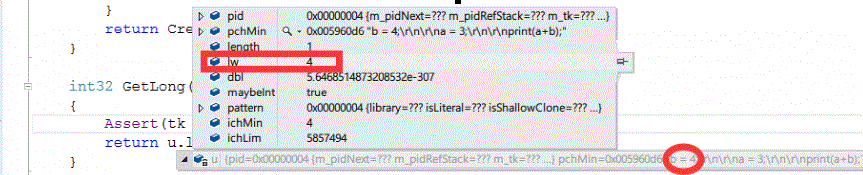
m_token.GetLong()可以看到,token早已解析好了一堆值,这里返回u.lw。即b=4的4。
CreateIntNodeWithScanner的实现如下:
ParseNodePtr Parser::CreateIntNodeWithScanner(int32 lw)
{
    Assert(!this->m_deferringAST);
    ParseNodePtr pnode = CreateNodeWithScanner<knopInt>();
    pnode->sxInt.lw = lw;
    return pnode;
}
也就是将4单独作为一个Node(type:knopInt)创建出来。
然后,程序调用ParsePostfixOperators,做一些简单的前缀修正。当然这里我们并不会触发这个修正。
pnode = ParsePostfixOperators<buildAST>(pnode, fAllowCall, fInNew, isAsyncExpr, &fCanAssign, &term, pfIsDotOrIndex);
返回上级ParseVariableDeclaration,这个knopInt并不会被加到列表中。最后,只有const被加入了AST。
void Parser::AddToNodeListEscapedUse(ParseNode ** ppnodeList, ParseNode *** pppnodeLast,
                           ParseNode * pnodeAdd)
{
    AddToNodeList(ppnodeList, pppnodeLast, pnodeAdd);
    pnodeAdd->SetIsInList();
}
扫描到分号,该行结束。
    switch (m_token.tk)
    {
    case tkSColon:
        m_pscan->Scan();
        if (pnode!= nullptr) pnode->grfpn |= PNodeFlags::fpnExplicitSemicolon;
        break;
这么处理完以后,AST中就会有var和const两个token了。
另外没有细说的是AddToNodeList。AddToNodeList会创建binNode(如果需要),并插入sxBin.pNode2中,如果要在Vs中遍历AST,可以从List开始遍历sxBin。
void Parser::AddToNodeList(ParseNode ** ppnodeList, ParseNode *** pppnodeLast,
                           ParseNode * pnodeAdd)
{
    Assert(!this->m_deferringAST);
    if (nullptr == *pppnodeLast)
    {
        // should be an empty list
        Assert(nullptr == *ppnodeList);

        *ppnodeList = pnodeAdd;
        *pppnodeLast = ppnodeList;
    }
    else
    {
        //
        AssertNodeMem(*ppnodeList);
        AssertNodeMem(**pppnodeLast);

        ParseNode *pnodeT = CreateBinNode(knopList, **pppnodeLast, pnodeAdd);
        **pppnodeLast = pnodeT;
        *pppnodeLast = &pnodeT->sxBin.pnode2;
    }
}
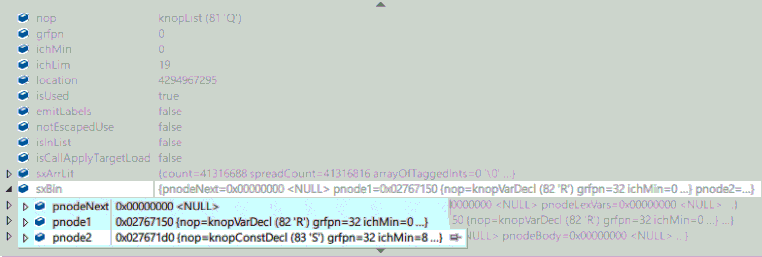
最终AST类似于:
pppnodeList
|
sxBin
|--pnode1 (knopVarDecl)-->knopNone
|--pnode2 (knopList)
    |
    sxBin
    |--pnode1 (knopConstDecl) -->knopNone
    |--pnode2 (knopList)
        |
        sxBin
|--knopAsg
            |
       sxBin
            |--pnode1 (knopName)
       |--pnode2 (knopInt) -- sxInt: 3
        |--knopCall
            |
             sxBin
            |--pnode1 (knopName)
            |--pnode2 (knopAdd)
                |
                sxBin
                |--pnode1 (knopName)
                |--pnode2 (knopName)
                     |
                  sxBin
                    |--pnode1
                    |--pnode2 (func)
+endNode
回到Js::ScriptContext::ParseScript,程序更新读取的字节数等信息,备份源,返回到Js::ScriptContext::LoadScript。
        ParseNodePtr parseTree = ParseScript(&parser, script, cb, pSrcInfo,
            pse, ppSourceInfo, rootDisplayName, loadScriptFlag,
            &sourceIndex, scriptSource);

        if (parseTree != nullptr)
        {
            pFunction = GenerateRootFunction(parseTree, sourceIndex, &parser, (*ppSourceInfo)->GetParseFlags(), pse, rootDisplayName);
        }
GenerateRootFunction
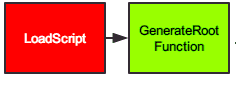
现在开始另一个函数的探索——GenerateRootFunction。在已经有了AST的情况下,这个函数负责生成bytecode,并让程序接下来能够跳转到RootFunction。
让我们开始。之前说到的操作,返回后会走到GenerateRootFunction。GenerateRootFunction定义如下:
JavascriptFunction* ScriptContext::GenerateRootFunction(ParseNodePtr parseTree, uint sourceIndex, Parser* parser, uint32 grfscr, CompileScriptException * pse, const char16 *rootDisplayName)
GenerateRoofFunction则会调用ByteCodeGenerator::Generate
HRESULT GenerateByteCode(__in ParseNode *pnode, __in uint32 grfscr, __in Js::ScriptContext* scriptContext, __inout Js::ParseableFunctionInfo ** ppRootFunc,
                         __in uint sourceIndex, __in bool forceNoNative, __in Parser* parser, __in CompileScriptException *pse, Js::ScopeInfo* parentScopeInfo,
                        Js::ScriptFunction ** functionRef)
{
    HRESULT hr = S_OK;
    ByteCodeGenerator byteCodeGenerator(scriptContext, parentScopeInfo);
    BEGIN_TRANSLATE_EXCEPTION_TO_HRESULT_NESTED
    {
        // Main code.
        ByteCodeGenerator::Generate(pnode, grfscr, &byteCodeGenerator, ppRootFunc, sourceIndex, forceNoNative, parser, functionRef);
    }
    END_TRANSLATE_EXCEPTION_TO_HRESULT(hr);

    if (FAILED(hr))
    {
        hr = pse->ProcessError(nullptr, hr, nullptr);
    }

    return hr;
}
看得出来这个就是主导生成字节码的入口了。这个函数的前几行获取各种上下文。确保生成的函数上下文全部正确。
void ByteCodeGenerator::Generate(__in ParseNode *pnode, uint32 grfscr, __in ByteCodeGenerator* byteCodeGenerator,
    __inout Js::ParseableFunctionInfo ** ppRootFunc, __in uint sourceIndex,
    __in bool forceNoNative, __in Parser* parser, Js::ScriptFunction **functionRef)
{
    Js::ScriptContext * scriptContext = byteCodeGenerator->scriptContext;

#ifdef PROFILE_EXEC
    scriptContext->ProfileBegin(Js::ByteCodePhase);
#endif
    JS_ETW_INTERNAL(EventWriteJSCRIPT_BYTECODEGEN_START(scriptContext, 0));

    ThreadContext * threadContext = scriptContext->GetThreadContext();
    Js::Utf8SourceInfo * utf8SourceInfo = scriptContext->GetSource(sourceIndex);
byteCodeGenerator->m_utf8SourceInfo = utf8SourceInfo;

    // For dynamic code, just provide a small number since that source info should have very few functions
    // For static code, the nextLocalFunctionId is a good guess of the initial size of the array to minimize reallocs
    SourceContextInfo * sourceContextInfo = utf8SourceInfo->GetSrcInfo()->sourceContextInfo;
    utf8SourceInfo->EnsureInitialized((grfscr & fscrDynamicCode) ? 4 : (sourceContextInfo->nextLocalFunctionId - pnode->sxFnc.functionId));
    sourceContextInfo->EnsureInitialized();
然后,程序会生成一个ByteCode的区域。并初始化,然后调用Visit第一次访问pnode。
ArenaAllocator localAlloc(_u("ByteCode"), threadContext->GetPageAllocator(), Js::Throw::OutOfMemory);
byteCodeGenerator->parser = parser;
byteCodeGenerator->SetCurrentSourceIndex(sourceIndex);
byteCodeGenerator->Begin(&localAlloc, grfscr, *ppRootFunc);
byteCodeGenerator->functionRef = functionRef;
Visit(pnode, byteCodeGenerator, Bind, AssignRegisters);
Visit中,程序根据pnode的类型,例如我的例子中,pnode就是一个knopProg,当然它代表的就是顶层的那个大函数了,程序会试图找到里面所有折叠的元素,包括eval以及with。方案很简单——遍历节点,找到所有可疑的并处理。之后,也会处理所有预设值,例如常量(字面值等)。
这一次Visit完成后,所有“刺头”基本就都被找到并处理了,然后,程序开始EmitProgram。
byteCodeGenerator->forceNoNative = forceNoNative;
byteCodeGenerator->EmitProgram(pnode);
在ByteCodeGenerator::EmitProgram中,程序会试图根据Ast的信息估算出合适的临时目录大小并初始化数据。
void ByteCodeGenerator::EmitProgram(ParseNode *pnodeProg)
{
    // Indicate that the binding phase is over.
    this->isBinding = false;
    this->trackEnvDepth = true;
    AssignPropertyIds(pnodeProg->sxFnc.funcInfo->byteCodeFunction);

    int32 initSize = this->maxAstSize / AstBytecodeRatioEstimate;

    // Use the temp allocator in bytecode write temp buffer.
    m_writer.InitData(this->alloc, initSize);
然后,对于我的例子,程序会走到EmitScopeList中。
if (this->parentScopeInfo)
{
    // Scope stack is already set up the way we want it, so don't visit the global scope.
    // Start emitting with the nested scope (i.e., the deferred function).
    this->EmitScopeList(pnodeProg->sxProg.pnodeScopes);
}
else
{
    this->EmitScopeList(pnodeProg);
}
在EmitScopeList中,程序会遍历pnode,而且根据pnode的类型,生成不同的字节码。
void ByteCodeGenerator::EmitScopeList(ParseNode *pnode, ParseNode *breakOnBodyScopeNode)
{
    while (pnode)
    {
        ……
        case knopProg:
            if (pnode->sxFnc.funcInfo)
            {
                FuncInfo* funcInfo = pnode->sxFnc.funcInfo;
                Scope* paramScope = funcInfo->GetParamScope();

                if (!funcInfo->IsBodyAndParamScopeMerged())
                {
                    funcInfo->SetCurrentChildScope(paramScope);
                }
                else
                {
                    funcInfo->SetCurrentChildScope(funcInfo->GetBodyScope());
                }
                this->StartEmitFunction(pnode);

                PushFuncInfo(_u("StartEmitFunction"), funcInfo);

                if (!funcInfo->IsBodyAndParamScopeMerged())
                {
                    this->EmitScopeList(pnode->sxFnc.pnodeBodyScope->sxBlock.pnodeScopes);
                }
                else
                {
                    this->EmitScopeList(pnode->sxFnc.pnodeScopes);
                }

                this->EmitOneFunction(pnode);
                this->EndEmitFunction(pnode);


                Assert(pnode->sxFnc.pnodeBody == nullptr || funcInfo->isReused || funcInfo->GetCurrentChildScope() == funcInfo->GetBodyScope());
                funcInfo->SetCurrentChildScope(nullptr);
            }
            pnode = pnode->sxFnc.pnodeNext;
            break;
在EmitOneFunction中,开始有生成字节码的操作。先从上往下慢慢看。
void ByteCodeGenerator::EmitOneFunction(ParseNode *pnode)
{
    Assert(pnode && (pnode->nop == knopProg || pnode->nop == knopFncDecl));
    FuncInfo *funcInfo = pnode->sxFnc.funcInfo;
    Assert(funcInfo != nullptr);

    if (funcInfo->IsFakeGlobalFunction(this->flags))
    {
        return;
    }

    Js::ParseableFunctionInfo* deferParseFunction = funcInfo->byteCodeFunction;
    deferParseFunction->SetGrfscr(deferParseFunction->GetGrfscr() | (this->flags & ~fscrDeferredFncExpression));
    deferParseFunction->SetSourceInfo(this->GetCurrentSourceIndex(),
        funcInfo->root,
        !!(this->flags & fscrEvalCode),
        ((this->flags & fscrDynamicCode) && !(this->flags & fscrEvalCode)));

    //提供参数个数,本例为0
deferParseFunction->SetInParamsCount(funcInfo->inArgsCount);

    //计算InArgCount。本例无默认参数,进else分支,参数为0。
if (pnode->sxFnc.HasDefaultArguments())
    {
        deferParseFunction->SetReportedInParamsCount(pnode->sxFnc.firstDefaultArg + 1);
    }
    else
    {
        deferParseFunction->SetReportedInParamsCount(funcInfo->inArgsCount);
    }
…………
获取解析后的Function Body的引用。
Js::FunctionBody* byteCodeFunction = funcInfo->GetParsedFunctionBody();
// We've now done a full parse of this function, so we no longer need to remember the extents
// and attributes of the top-level nested functions. (The above code has run for all of those,
// so they have pointers to the stub sub-trees they need.)
byteCodeFunction->SetDeferredStubs(nullptr);

try
{
    if (!funcInfo->IsGlobalFunction())
    {
……
进行必要的内存分配等初始化操作后,开始对BinaryWriter进行初始化。Begin操作和End/Reset操作是对应的。Begin时开始初始化,End时将所有内容都写入,且处理好所有需要再次计算的,包括跳转,函数调用等的信息。Reset则放弃操作。
    m_writer.Begin(byteCodeFunction, alloc, this->DoJitLoopBodies(funcInfo), funcInfo->hasLoop, this->IsInDebugMode());
    this->PushFuncInfo(_u("EmitOneFunction"), funcInfo);

    this->inPrologue = true;
根据ByteCodeWriter::Begin的注释,我们也大致可以了解Begin的操作:
1、 Begin设置好实例,然后为指定的JavascriptFunction生成字节码。
2、 调用完End()之后,字节码才会被写入。或者调用Reset()来放弃操作。
3、 每个ByteCodeWriter都可能会被多次使用,但是每次只会为一个函数生成一个字节码流。
事实上,Begin实际就是这么一个初始化函数:
void ByteCodeWriter::Begin(FunctionBody* functionWrite, ArenaAllocator* alloc, bool doJitLoopBodies, bool hasLoop, bool inDebugMode)
{
    Assert(!isInUse);
    AssertMsg(m_functionWrite == nullptr, "Cannot nest Begin() calls");
    AssertMsg(functionWrite != nullptr, "Must have valid function to write");
    AssertMsg(functionWrite->GetByteCode() == nullptr, "Function should not already have a byte-code body");
    AssertMsg(functionWrite->GetLocalsCount() > 0, "Must always have R0 for return-value");

    DebugOnly(isInUse = true);
    m_functionWrite = functionWrite;
    m_doJitLoopBodies = doJitLoopBodies;
    m_doInterruptProbe = functionWrite->GetScriptContext()->GetThreadContext()->DoInterruptProbe(functionWrite);
    m_hasLoop = hasLoop;
    m_isInDebugMode = inDebugMode;
}
进入Prologue之后
1、检查是否是Class构造函数。需要对它特殊处理。
2、获取对应的Scope。
3、提交所有的常量,包括我们的4、3。通过LoadAllConstants(funcInfo);实现。
其余包括整数、字符串、字符串模板调用点、浮点(double)。
对于整数,Chakra调用ToVar来简单加密。确保未发生整数溢出的情况下,做一次左移位
    Var intConst = JavascriptNumber::ToVar((int32)val, scriptContext);

    this->RecordConstant(location, intConst);
实现:
return reinterpret_cast<Var>((nValue << VarTag_Shift) | AtomTag_IntPtr);
此处 varTag_Shift == 1, AtomTag_IntPtr == 1。
例如4加密后为9。
4、读取有名称的函数对象,例如 x = function f() {},把它放入Slot。
……省略许多
5、ByteCodeGenerator::DefineFunctions
忽略文本顺序,在调用scope之前,对整个scope范围内的函数定义进行字节码提交。
调用DefineCachedFunctions/DefineUncachedFunctions
    this->inPrologue = false;


    if (funcInfo->IsGlobalFunction())

    {

        EmitGlobalBody(funcInfo);

    }

else

{

        EmitFunctionBody(funcInfo);

    }
In EmitGlobalBody:
1、 遍历节点(while(pNode = pNode->sxBin.pNode2))。对每个节点进行简单检查,我们的例子中全部会走到EmitTopLevelStatement。
EmitTopLevelStatement(stmt, funcInfo, false);
在EmitTopLevelStatement中,函数调用Emit挨个提交:
Emit(stmt, this, funcInfo, fReturnValue, false/*isConstructorCall*/, nullptr/*bindPnode*/, true/*isTopLevel*/);


stmt:
-       stmt    0x030d7150 {nop=knopVarDecl (82 'R') grfpn=32 ichMin=0 ...} ParseNode *
        nop knopVarDecl (82 'R')    OpCode

funcInfo:
-       funcInfo    0x030d8028 {inlineCacheCount=0 rootObjectLoadInlineCacheCount=0 rootObjectLoadMethodInlineCacheCount=...}   FuncInfo *
+       name    0x1090b324 L"glo"   const wchar_t *
在Emit中,var、const、let被视为同类。
    case knopVarDecl:
    case knopConstDecl:
    case knopLetDecl:
    {
        // Emit initialization code
        ParseNodePtr initNode = pnode->sxVar.pnodeInit;
……
注意我们的var a,sym定义了它的名称,pnodeNext标记了它在AST中没有子节点。
-       pnode->sxVar    {pnodeNext=0x00000000 <NULL> pid=0x011c3c14 {m_pidNext=0x00000000 <NULL> m_pidRefStack=0x00000000 <NULL> ...} ...}  PnVar
+       pnodeNext   0x00000000 <NULL>   ParseNode *
+       sym 0x030d7198 {name={string=0x011c3c2e L"a" len=1 } pid=0x011c3c14 {m_pidNext=0x00000000 <NULL> m_pidRefStack=...} ...}    Symbol *
看一下对const的处理,因为const有init(const b = 4;),所以
ParseNodePtr initNode = pnode->sxVar.pnodeInit;
这里得到sxVar.pnodeInit是为非null的,因此,触发了Init流程。
    if (initNode != nullptr || pnode->nop == knopLetDecl)
    {
        Symbol *sym = pnode->sxVar.sym;
        Js::RegSlot rhsLocation;

        byteCodeGenerator->StartStatement(pnode);

        if (initNode != nullptr)
        {
            Emit(initNode, byteCodeGenerator, funcInfo, false);
函数emit该initNode(const b,+nop)。以下是initNode的具体细节,可以看到sxInt为4,我们的初始值。
-       initNode    0x030d7250 {nop=knopInt (2 '\x2') grfpn=0 ichMin=18 ...}    ParseNode *
+       sxInt   {lw=4 } PnInt
完事后,函数开始emit这个node的Assignment操作(=4,to b)
EmitAssignment(nullptr, pnode, rhsLocation, byteCodeGenerator, funcInfo);
三大家族齐聚一堂:
case knopVarDecl:
case knopLetDecl:
case knopConstDecl:
{
    Symbol *sym = lhs->sxVar.sym;
    Assert(sym != nullptr);
    byteCodeGenerator->EmitPropStore(rhsLocation, sym, nullptr, funcInfo, lhs->nop == knopLetDecl, lhs->nop == knopConstDecl);
    break;
}
然后,结束Emit。
void ByteCodeGenerator::EmitGlobalBody(FuncInfo *funcInfo)
在提交完GlobalObject后,完成所有Emit操作。这里仅仅都是预处理,没有生成字节码。
在其BeginEmitBlock函数调用的EmitOneFunction中,终于会调用各种编码函数生成字节码了。
::BeginEmitBlock(pnode->sxFnc.pnodeScopes, this, funcInfo);
我们可以第一次看到向缓冲区写入字节码的操作,操作发生时栈如下。 ByteCodeWriter::Data::EncodeT根据类型的序号,找到对应内容编码,并调用Js::ByteCodeWriter::Data::Write写入缓冲区。然后移动写入指针。

>dd 0x012486d8
0x012486D8  00000000 00000000 00000000 00000000
0x012486E8  00000000 00000000 00000000 00000000
0x012486F8  00000000 00000000 00000000 00000000
0x01248708  00000000 00000000 00000000 00000000
>dd 0x012486d8
0x012486D8  0000004c 00000000 00000000 00000000
0x012486E8  00000000 00000000 00000000 00000000
0x012486F8  00000000 00000000 00000000 00000000
0x01248708  00000000 00000000 00000000 00000000
这是写入1字节操作码前后的缓冲区变化。
>   ChakraCore.dll!Js::ByteCodeWriter::DataChunk::WriteUnsafe(const void * data, unsigned int byteSize) 行 60    C++
    ChakraCore.dll!Js::ByteCodeWriter::Data::Write(const void * data, unsigned int byteSize) 行 3340 C++
    ChakraCore.dll!Js::ByteCodeWriter::Data::EncodeOpCode<0>(unsigned short op, Js::ByteCodeWriter * writer) 行 3259 C++
    ChakraCore.dll!Js::ByteCodeWriter::Data::EncodeT<0>(Js::OpCode op, Js::ByteCodeWriter * writer) 行 3308  C++
    ChakraCore.dll!Js::ByteCodeWriter::Data::EncodeT<0>(Js::OpCode op, const void * rawData, int byteSize, Js::ByteCodeWriter * writer) 行 3321  C++
    ChakraCore.dll!Js::ByteCodeWriter::TryWriteElementRootU<Js::LayoutSizePolicy<0> >(Js::OpCode op, unsigned int index) 行 1833 C++
    ChakraCore.dll!Js::ByteCodeWriter::ElementRootU(Js::OpCode op, unsigned int index) 行 1844   C++
    ChakraCore.dll!ByteCodeGenerator::EnsureNoRedeclarations::__l25::<lambda>(ParseNode * pnode) 行 5901 C++
    ChakraCore.dll!ByteCodeGenerator::IterateBlockScopedVariables<void <lambda>(ParseNode *) >(ParseNode * pnodeBlock, ByteCodeGenerator::EnsureNoRedeclarations::__l25::void <lambda>(ParseNode *) fn) 行 418   C++
    ChakraCore.dll!ByteCodeGenerator::EnsureNoRedeclarations(ParseNode * pnodeBlock, FuncInfo * funcInfo) 行 5904    C++
    ChakraCore.dll!ByteCodeGenerator::EmitOneFunction(ParseNode * pnode) 行 3251 C++
BinaryWriter::End
未完待续。